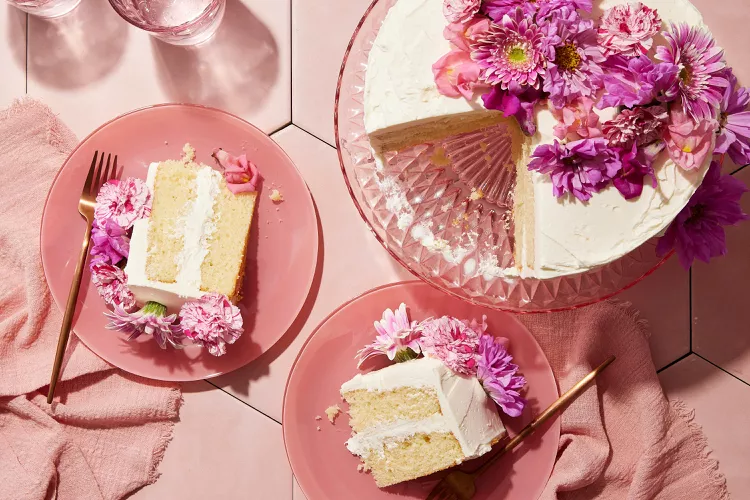
Light, fluffy, and covered in frosting—whether it’s a classic vanilla cake or something for chocolate lovers, a deliciously moist cake is a staple centerpiece for any special occasion. Many of our best cake recipes start with the same method: beating butter or shortening with sugar until it’s fluffy. These cakes are sometimes called creamed cakes, because the fat and sugar are creamed together. Using our Test Kitchen’s tried and true methods, we’ll teach you how to make a homemade cake that's so good everyone will think you bought it from a fancy bakery. While it takes a bit of time, you’re about to learn that none of these steps for making a cake are actually very difficult.
How to Bake a Cake
First you’ll have to choose a recipe. You can keep it simple with a yellow cake, or you can choose a slightly showier recipe, like a chocolate devil’s food cake or a vibrant red velvet cake. If you’re not a fan of the traditional frostings, try a German chocolate cake. We also have a few birthday cake recipes for celebratory occasions. The possibilities are almost endless, and these directions will help you make them all, but angel food, pound cakes, sponge cakes, and chiffon cakes require different methods, so read up on those separately.
Step 1: Prepare Baking Pans
No one wants a cake to stick to the pan, so it’s important to prep your pans before pouring in the batter. With the exception of angel food and chiffon cakes, most recipes call for greasing and flouring the pan or lining the pan with waxed or parchment paper.
As for selecting the right type of baking pan to use, our Test Kitchen prefers shiny pans, which absorb less heat and produce a golden crust. Pans with a dark or dull finish absorb more heat and may burn your crust, so if you’re using one of these, reduce your oven temperature by 25°F and check on the cake 3-5 minutes earlier than the recipe suggests.
Step 2: Allow Ingredients to Reach Room Temperature
Many recipes require cake ingredients, such as eggs and butter, to stand at room temperature. This allows the butter to blend easily with other ingredients, and the eggs will yield a higher cake volume. (For food safety reasons, don’t leave the eggs at room temperature for more time than specified in the recipe.)
Test Kitchen Tip: Never use melted butter when softened butter is called for. It will ruin the cake’s texture.
Step 3: Preheat the Oven
When a cake bakes too quickly, it can develop tunnels and cracks; too slowly, and it can be coarse. Allow your oven to preheat for at least 10 minutes, and use an oven thermometer to be sure it’s reached the proper temperature. If you’re using dark cake pans, you’ll want to reduce the oven temperature called for in your recipe by 25°F.
Step 4: Stir Together Dry Ingredients
Dry ingredients usually include flour, baking powder and/or baking soda, and salt. Rather than adding each dry ingredient individually to the batter, whisk them together in a bowl beforehand. That way you’ll know the ingredients will be equally distributed throughout the batter.
Step 5: Combine the Butter and Sugar
Wondering how to make a cake with a light, airy crumb? Creaming butter and sugar is the most important step. Here’s how:
- Using a mixer on medium to high speed, beat the butter for 30 seconds. Generally, a stand mixer requires a medium speed for this step, but a hand mixer requires a higher speed.
- Add the sugar (and vanilla if the recipe calls for it) and beat the mixture on medium speed until it is combined and has a light, fluffy texture. This will take 3 to 5 minutes. (Do not cut this short.) Scrape the bowl occasionally while beating. Tiny bubbles will be created as the butter and sugar are combined, which will give your cake that light, fluffy texture.
Step 6: Add Eggs One at a Time
Add the eggs (or egg whites) one at a time, beating well after each. Their protein creates a structure around the air bubbles that will maintain the texture.
Test Kitchen Tip: Break the eggs individually into a custard cup or small bowl first. This way, if you get shell fragments, you can easily fish them out of the cup, rather than trying to get them out of the batter.
Step 7: Alternate Adding Dry and Wet Ingredients
Alternate between adding some of the dry mixture and some of the milk (or whatever liquid is specified in your recipe) to the butter-egg-sugar mixture, beating on low speed after each addition until everything is combined. Begin and end with the flour mixture, as when liquid is mixed into flour, gluten begins to form. Too much gluten makes for a tough cake, so be sure to start and finish with the flour, and be careful not to overmix once you’ve added liquid. Be careful not to overmix at this stage or you might get elongated, irregular holes in the finished cake.
Step 8: Pour Batter into Pans and Bake
Divide the batter evenly between the baking pans. Use an offset spatula to spread the batter in an even layer. Be sure to spread it to the pan’s edge. Bake your cake according to your recipe’s directions.
Step 9: Check Cake for Doneness
Overbaked cake equals dry cake, and no one wants that. Start checking the cake for doneness after the recipe’s stated minimum baking time, but avoid opening the oven door before then, so that the heat doesn’t escape. For creamed cakes, insert a wooden toothpick near the center of the cake. If the pick comes out clean (with only a crumb or two on it), the cake is done. If there is any wet batter on it, bake the cake for a few minutes more and test in a new spot with a new toothpick.
Step 10: Cool the Cake Layers
Let the cake layers cool in their pans on a wire rack for 10 minutes maximum. To remove the cakes from the pans, run a knife around the edges, which will loosen them from the sides of the pans. Place a wire rack over the top of each cake and flip the pan. Gently lift the pans off, being careful not to tear the edges of the cakes. If you used waxed or parchment paper, carefully peel the paper off the cake.
Allow the cake to cool completely (about 1 hour). This is a key step to letting the cake firm up, making it less likely to break apart as you frost it. (And it keeps the frosting from melting as soon as you spread it!)
Step 11: Assemble the Cake
To avoid crumbs in your frosting, brush the cake layers with a pastry brush. Spread about a ½ cup of frosting over the first layer, then carefully top it with the next layer. Repeat until all the layers are stacked.
Test Kitchen Tip: It takes about 2½ to 3 cups of icing to generously fill and frost a two-layer, 9-inch cake. For a three-layer cake, plan on using 3½ to 4 cups.
Step 12: Add a Crumb Coat
The secret to knowing how to frost a layer cake is a crumb coat. To do this, spread a very thin layer of frosting over the sides and top of the cake. This initial coat doesn’t need to look perfect; it’s another way to keep the crumbs out of the frosting. Let the cake stand for 30 minutes so the frosting sets up.
Test Kitchen Tip: For a quick cleanup, tuck small pieces of waxed paper around and under the first layer, which should be on a cake pedestal or cake plate.
Step 13: Frost and Decorate
Using an offset spatula or table knife, generously spread the remaining frosting over the top and sides of the cake, swirling as you go. Once the cake is completely covered, go back and add more swirls as desired. Serve the cake within 2 hours or store in the refrigerator.
Now that you know how to make a cake from scratch, keep practicing your cake decorating skills at home with different colored frosting, piping techniques, and toppings. For more cake ideas, here are some easy and elegant cake recipes to inspire your next baking session.